Synchronising your accounts software with Surefire
Please log into Surefire as normal and, in the main navigation menu on the left hand side you will see the ‘Accounts
integration’ option. Please click on this as shown below, and you will be taken to a screen where you are asked to
select the accounts package you want to synchronise with.
Click on the ‘Login’ button as shown below and you will be asked to log into your accounts package. At this stage,
please enter your username and password for your accounts software as prompted. When submitted, your Surefire
and accounts package will now be synchronised, and you’ll be taken to the Accounts Integration page.
t the top of the page you will see the navigation pane with the various ‘tabs’ that make up the accounts Integration
package within Surefire. You are now synchronised and ready to start using the Accounts Integration.
We will now explore these 8 navigation tabs.
For first time users, please ensure you follow this guide in the order set out below.

1. Configuration and Set-up

Settings
The first step is to determine how you want to use the Accounts Integration. This can vary from a very basic integration,
to a more tailored solution. The Surefire Accounts Integration is designed to meet your needs in either case.
Firstly please navigate to the ‘Settings’ section of the accounts page via the menu across the top of the page͘
The first section, ‘General Settings’, will display a tick box to choose whether you would like to create ‘Prepayments
for deposits’. In short, if you take a deposit for any type of job, an installation for example, it is best practice to
represent this deposit within your account’s software. However, accounts packages do not allow for the concept of a
deposit, or an advance payment.
Therefore, the solution to this it that Surefire will generate what is known as a ‘prepayment’ on the customer account
to represent the deposit money that has been received in advance of the works taking place.
Once the job for which the deposit (prepayment) has been completed, the system will generate an invoice for the
whole balance of the job, and the prepayment will be removed from the outstanding balance.
The section below should be completed based on your own payment terms. The company below, for example, sets
the due date on their invoices as 1 day after the invoice is raised. Some companies allow 30 or even 60 day terms, the
terms set within these settings will appear on your invoices.
To the right, we have the ‘Payment Settings’͘ These settings let you determine which Payment Types an invoice will
be created for AND which payment types should be marked as ‘Paid’͘
Here are 3 key examples to illustrate how these settings work:
1. For payment type ‘Free of Charge’, this might be a call-back, or a job under warranty for example, you do not
want to raise an invoice for this. Therefore, neither box should be checked.
2. For payment type ‘Office to Invoice’, (where the engineer is not collecting payment from the customer at the
end of the job for example), the customer needs to be sent an invoice as they have not paid for the works yet.
Therefore, only the ‘Raise Invoice’ box should be checked green.
3.For payment type ‘Credit Card’, where the customer has paid for the works using a credit or debit card, both
boxes should be checked green as you will want to raise an invoice to represent the works that have been
carried out, and to mark that the invoice has been Paid.
Tip: Many companies opt not to use the ‘Raise Payment’ function at all and to simply raise invoices for all jobs and
settle them down manually once paid.

2. Nominal Codes

You can set & map your nominal codes up in the ‘Nominal Codes’ section of Surefire͘
Nominal Codes are commonly used in all accounting software to provide an indication as to the nature of the work
being carried out, associated with an invoice.
The first step in configuring your Accounts Integration is to add your own Nominal Codes. The nominal codes you
create in Surefire must replicate precisely the ones already existing in your accounts software.
The below screenshot shows the page you will be presented with. The section on the left side is where you will add
your Nominal Codes by firstly entering the Name of the nominal code, and then the associated Code, before clicking
on the ‘ dd’ button.
Each time you click Add, Surefire will allow you to add another nominal code and will save each line until you have
added them all.
TIP: You need to add your Nominal Codes for your Sales AND your Purchases, as exemplified below:
Once you have set up your nominal codes in Surefire (ensuring they are the same as your accounts software), you will
be able to Map your nominal codes to an appointment type on the right side of the page.
By mapping your codes to each appointment type, it will automatically assign that nominal code to the sales invoice
when it is generated, e.g. in the below example this company has used nominal code ‘4001 - Sales Installation’ for
the appointment type ‘Installations’. This is not mandatory, but it is highly recommended where possible in order to
save you from having to manually allocate your nominal codes on each invoice you raise.
Tip: it is still possible to change an automatically mapped nominal code on an invoice at a later date before raising the
invoice

3. Bank Codes

You will need to do the same for your ‘Bank Codes’, or bank accounts. Bank codes are used to assign payments to a
specific bank account if you wish to have different payment types associated with different accounts, most
companies will only use one account for all payment types.
Bank Codes are commonly used in all accounting software to represent what company account (typically a bank
account) a payment will be assigned to for reconciliation.
Again, this must replicate the bank code exactly as shown in your accounting software. The below company, for
example, has two active bank account codes, 1200 and 1202. You should add your own Bank Code(s) on the left side
of the screen by firstly entering the Name of the bank code, and then the associated Code, before clicking on the ‘ dd’
button. N.B. Most companies will only have one bank account for all payments.
The process is the same as that for the Nominal Codes; each time you click Add, Surefire will allow you to add another
nominal code and will save each line until you have added them all.
Then on the right side, you can assign the different Payment Types within Surefire to the relevant Bank Code you
would like that payment to go to in your accounts package.

4. Sales Invoices

i.
Automatic Sales Invoices
Now we have configured all of our settings and set up our codes, we can begin creating invoices and exporting them
to your chosen Accounting software package.
The logic behind the automatic Sales Invoice generation feeds directly from your completed job certificates in Surefire.
When completion certificates are completed in the app and submitted by an engineers, they contain all of the relevant
data needed for an Invoice to be raised. Therefore on reviewing certificate in your ‘Posts’ queue, you are also doing a
first check on whether the job cost and payment details are correct for invoicing.
Regular Surefire users should be familiar with the Posts queue, but if not then please contact Support.
Each time a customer job certificate is received and ‘Processed’ by a user in the Posts queue, Surefire will send the
information to the Accounts Integration section in Surefire. For clarity, below is the Process button that will send the
instruction to create an Invoice in the Surefire Accounts Integration.
Once you have processed your completion certificate(s), you can then navigate to the ‘Sales Invoices’ section of the
Accounts Integration and you will find a list of your proposed invoices created in Surefire, as shown in the below image
where there are 2 invoices awaiting review, for customers called Danny Nash and Nicola Wood:
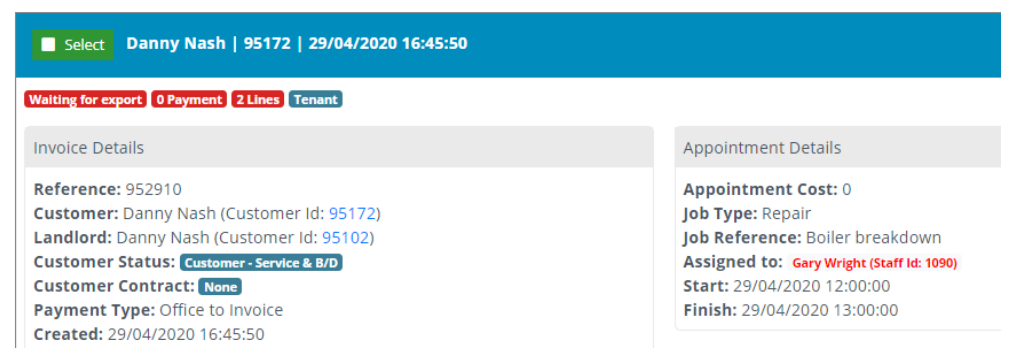
The blue ‘preview pane’ above shows the basic customer & job details: Name, Customer ID and Date created. It also
shows what type of Invoice it is, usually either a Deposit or a Sales Invoice, in red.
By clicking anywhere within the blue box you will expand the chosen Invoice and be able to view all of the details.
Firstly we will look at Danny’s invoice:
Firstly, you are able to see [at a glance] the key Customer details, Appointment details and Invoice details. Note the
payment type on this example is ‘Office to Invoice’:
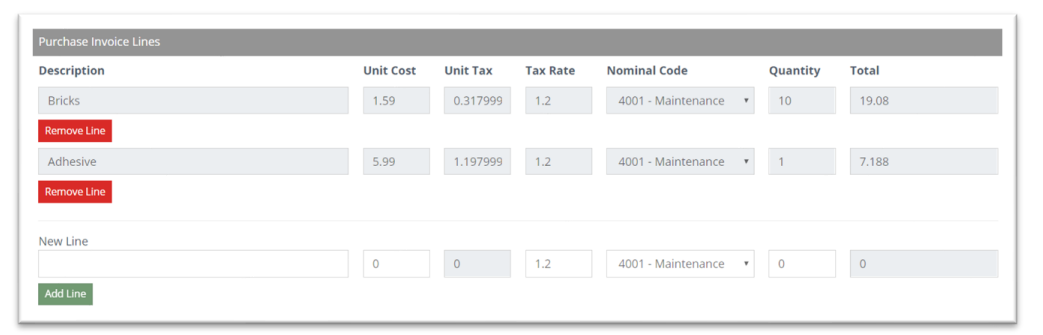
The next section shows the ‘Invoice Lines’ which have the critical payment details of the Invoice that you are about
to raise, namely the Item description, the Costs of each Item, the Tax rate, and the Total gross amount being
invoiced.
Tip: All of these fields are editable, and if you want to add an additional line on the invoice you can do so using one of
the ‘ dd Line’ buttons, at the relevant tax rate.
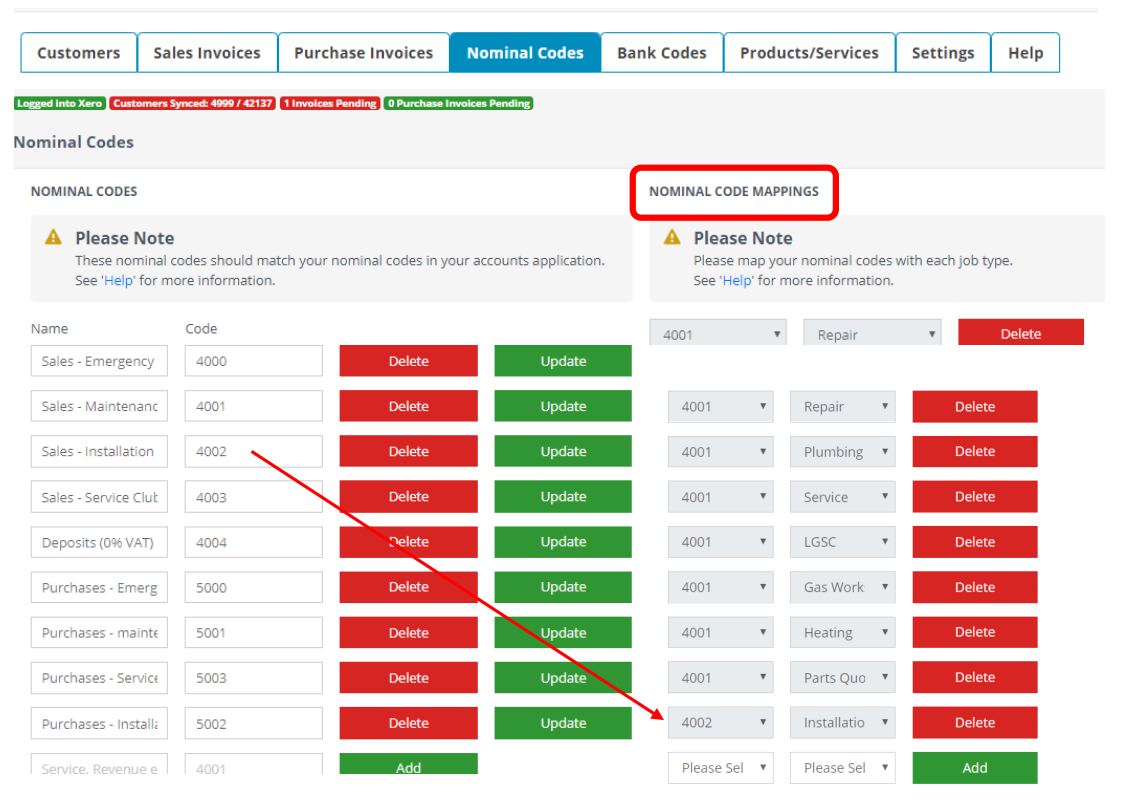
You will also notice that the Nominal Code field will be prepopulated based on the Mappings we set up in the
Nominal Code section (see page 6). If no mappings are set, then the nominal code will need to be selected manually
via the drop down:
Furthermore, at the bottom there are options to ‘View ppointment’ to see the original appointment in Surefire, and
‘View Post’ to see the completion certificate which has generated the invoice. These will open in a new tab so it does
not interrupt your accounts checks, and are extremely important features in order to verify that the Invoice you are
about to raise is correct based on the original job notes, price, etc
You are also able to Delete the invoice in this navigation panel, which will mean the Invoice is not sent to the accounts
package - note, if your Delete an item in error, simply go back to the Post in the customer History and click ‘Process’
again to regenerate the Invoice.
Once you are happy that all fields are as expected, click on the ‘Export Sales Invoice’ button (bottom right) and this
will then export a sales invoice to your accounts package against Danny Nash’s profile͘
In the other example, for customer Nicola Wood, the payment type was Credit Card. Due to the way in which we
configured our Settings (see page 4), we have determined that invoices with payment type Credit Card should be
sent to your accounts package and immediately marked as paid. Therefore, on Nicola’s invoice in Surefire, there are
two sections with figures; one for the invoice, and one for the payment, as circled in red below:
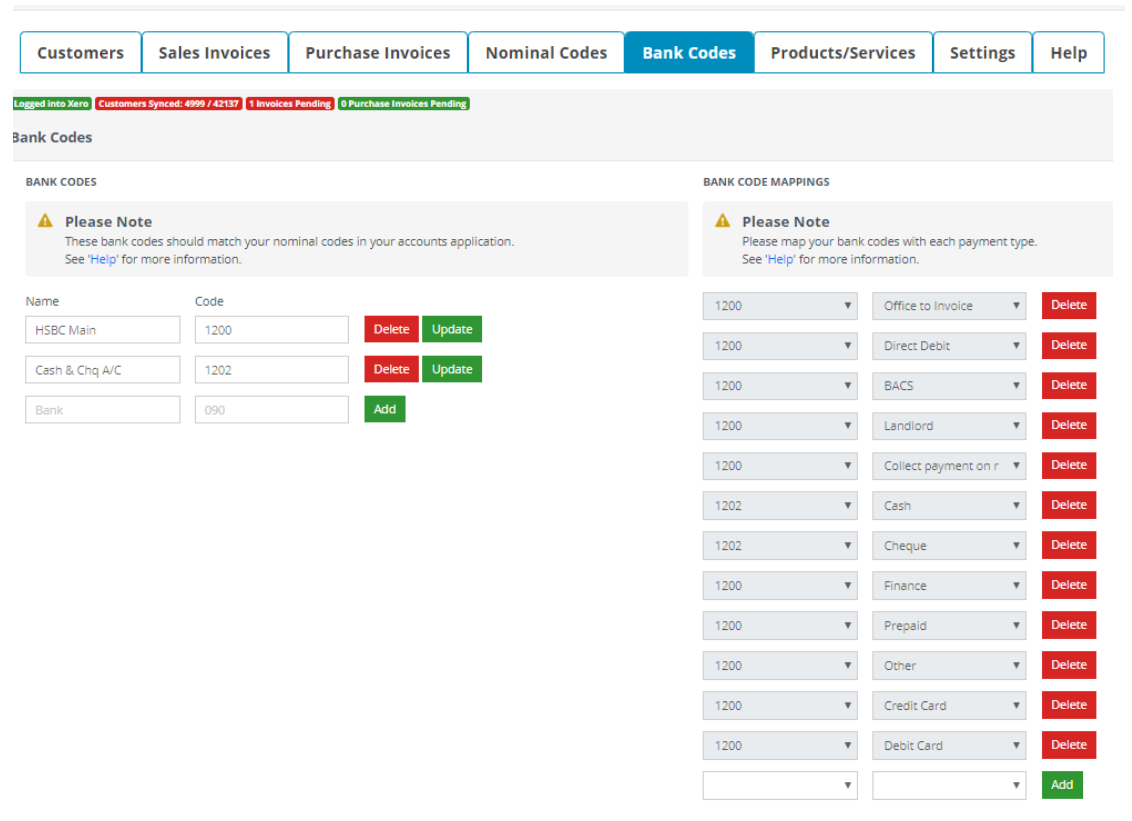
The ‘Payments’ sections shows the Credit Card payment that has been received, and will allocate the Bank Code based
on your mappings (see page 7). Alternatively you can select the Bank Code from the drop down.
Again, simply click the ‘Export Sales Invoice’ button and the invoice will be sent and raised in your accounts package,
and marked as paid. Therefore, Nicola will not be send an invoice, but this will allow you show that an Invoice was
raised and paid for. You can also raise a Receipt and send it to her if you so wish, within your Accounts package.
ii.
Manual Sales Invoices
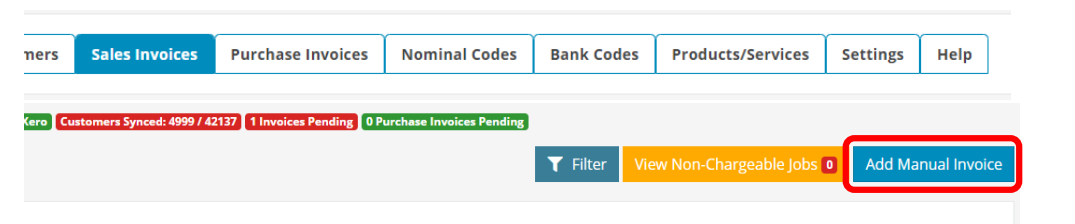
You can create a manual invoice in Surefire via the ‘Add Manual Invoice’ button situated in the top right of the
accounts screen:
You will be presented with a blank invoice screen.
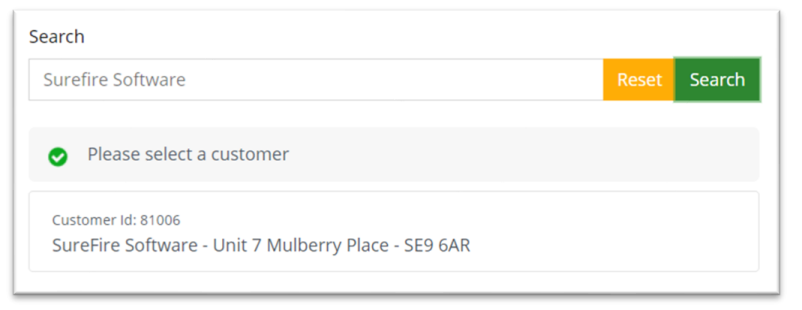
Firstly, search for the customer you are creating the invoice for.
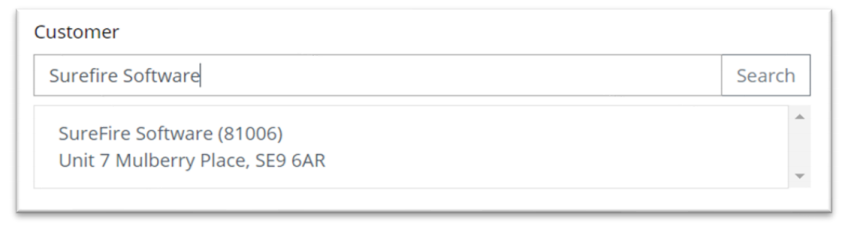
Then, select a ‘Due date’ for the invoice.
We then need to add a ‘Line’ to the invoice͘ This will specify what the invoice is for and how much is due or has been
paid͘ Click on the ‘Add line’ button to add this to the invoice.
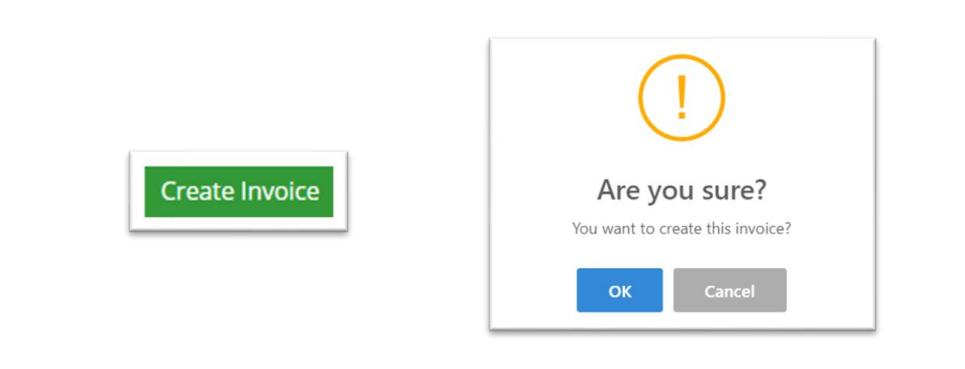
Now you have added the details to your invoice, click on the ‘Create invoice’ button at the bottom of the screen͘ You
will be asked if you want to add the invoice, so ensure you have double checked the details before submitting.
The invoice can now be viewed in the ‘Sales Invoices’ section and you can export this to your accounts software for
processing.
iii.
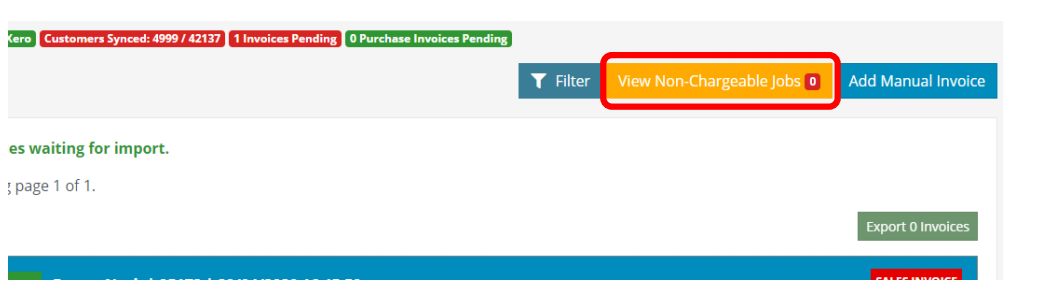
Non-Chargeable Jobs queue (Automatic)
The final core area of Sales Invoices is the Non-Chargeable jobs queue. This is where any jobs that do not require an
invoice to be raised are sent to be sanity checked, after the Post has been processed.
Jobs queue as we determined earlier that this payment type should NOT Raise an Invoice (see page 4).
This queue allows you to check that those jobs have been completed correctly, and no payments have been ‘missed’
or wrong payment type used in error͘ If everything is OK then you can simply ‘process’ the item from the queue and it
will disappear.
It is recommended that this queue is cleared at the end of each day.

5. Purchase Invoices

Purchase Invoices can either be added manually, or if you are a Wolseley customer your purchase invoices can be
uploaded via a csv. file on a daily basis.
i.
Manual Purchase Invoices
For most purchase invoices, it will need to be done manually via the ‘Add Purchase Invoice’ button͘
Similar to creating a Sales Invoice, you must complete the ‘New Purchase Invoice’ form͘
Firstly, select a supplier from your list of suppliers.
You must then search for the customer that the purchase invoice relates to.
You will then be given a list of recent appointments for that customer. Select the appropriate appointment associated
to the purchase invoice
Once you have selected the appointment, you can then add lines to your purchase invoice by completing the relevant
fields, and clicking on the ‘Add Line’ button to add each invoice item.
When you have added all the items to your purchase invoice, click on the ‘Create Purchase Invoice’ button in the
bottom left of the screen to create your invoice. You will be asked to confirm your submission, so please ensure you
have checked that the details on the invoice are correct.
Once this has been created, it will now be in the Purchase Invoices queue.
Please navigate to the Purchase Invoices tab again and you will see the invoice is now there awaiting approval to send
to your Accounts package:
To export the purchase invoice, simply click ‘Export Purchase Invoice’ at the bottom right.
ii.
Uploaded Sales Invoices (Wolseley)
You can import your purchase invoices directly from a Wolseley ͘csv file In the ‘Purchase Invoices’ section, there is an
‘Import CSV’ button in the top right corner͘
You will be asked to select the template, supplier and the file itself͘ Once you have selected these, click on the ‘Import’
button in the bottom right corner of the pop up.
Therein the Purchase invoices will be converted and sent to the Purchase Invoices queue for you to check and Export.

6. Customers

The default landing page is the ‘Customers’ tab, on which you will see listed every customer in your company’s Surefire
database, ready to link with your accounts package when required. Each time an invoice is raised for a customer, they
will automatically be exported to your accounts package without any prompt from the user.
alternatively, to the right of the customer’s name, we have an ‘Export’ button which will export the customer data
from Surefire to your accounts database manually, regardless of whether you wish to raise an invoice against that
customer or not͘ Once you have clicked ‘Export’, you will be able to see that customer record has been created in your
accounts package.
If at any point you change or update that customer’s details in Surefire (for example, changing their first name), and
wish to push this new data into your accounts package, you can do so by finding the customer using the ‘Filter’ function
at the top right of the above screen, and then clicking on ‘Update Export’. NOTE: This option will only be available if
the customer has been exported to your accounts package previously.
This update feature is only for situations where you want to sync your contacts manually. Each time a new invoice is
sent to your Accounts package for a customer, the customer details will be automatically updated as part of the
process, so no manual intervention will be required.

7. Help

The help section provides some additional definitions and assistance in navigating the accounts integrations whilst
logged in, as shown below, divided into the core navigation areas.
Tip: We really recommend you read the Help section in detail, in conjunction with this guide, to get a full understanding
of the system

8. FAQ


What functionality is available?
- Export surefire contacts into Xero.
- Export of surefire invoices into Xero.
- Import your xero chart of accounts into Xero.